April 24th, 2019 at 07:20 am
April 24 – National Pigs-In-A-Blanket Day
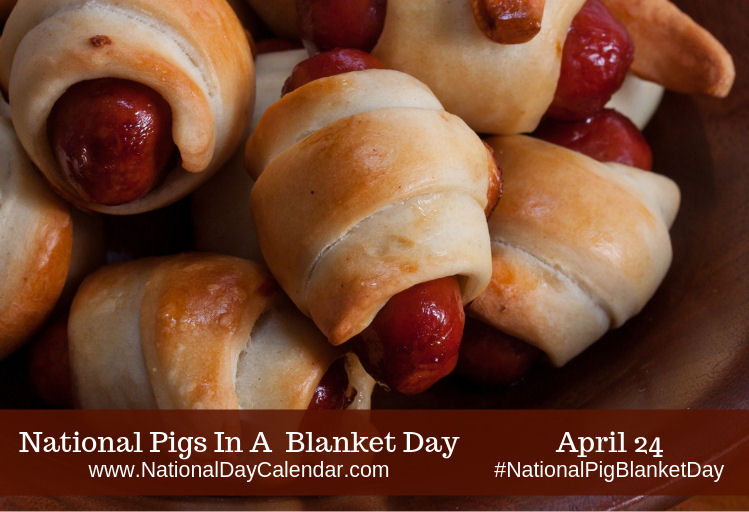
When you are allerigic to fish,
you need an All-American hors d’oeuvres
Cut hot dogs into 1.5 inch pieces
optional: Pan or TenderCrisp for crispy edges
PreHeat Oven to 375°F.
OR Ninja Foodi Bake 350°F
while preheating …
Unroll dough = separate into triangles.
Cut each triangle lengthwise
Roll each piece Dog
Optional – cut slivers of cheese and lay on dough before rolling
Ninja Foodi
lay pieces in Tendercrisp Basket
Bake 8-12 mins = check at 10 mins
Or
Oven Bake:
lay pieces on lined baking sheet with room between
Bake 12 to 15 mins (check for golden brown at 12
Serve with spice condiments of your choice for dipping
April 21st, 2019 at 10:25 am
Ninja Foodi ™
aka/ “Foodi” is a countertop kitchen appliance that combines the functions of an (EPC) Electric Pressure Cooker and (AF) AirFryer
Shark/Ninja describes its TenderCrisp(tm) “most” AF functions that are preceded by use of the (PC) Pressure Cook functionality
The ability to go from PC to AF for TenderCrisp(tm) is one of the best features of the Ninja Foodi (or at least in my opinion)
draft posted 20-Apr-2019
April 20th, 2019 at 09:30 am
US = OP300 vs UK = OP300UK
The Ninja Foodi has been available in the US for some months longer than in the UK. It is my understanding that its availability in the UK is rather recent.
There are a few difference between the US OP300 & UK’s OP300UK version. Notably Temp is Centigrade – most recipes I have seen are listed in Fahrenheit owners guide – and the interface reflects that.
The other potentially confusing thing I noticed in a quick stare & compare was the use of the term Grill in the UK – The US models use “Broil”
It may be (but I do not know) that the included recipe book may have been edited to Brit/Metric terminology – giving quanity in grams instead of ounces – perhaps you can confirm that for this inquiring mind.
Since it is a OP300 version, the Dehydrate function is not offered.
It also seems that the “unique to Ninja Foodi Accessories” are not yet offered in the UK as yet
Although “rumor has it” that Shark/ninja will be offering several on Amazon in both the US and the UK sometime soon (today is April 2019)
Many, if not most of the accessories we discuss are often found on Amazon so that is one place my Brit friends have been successful in finding useful pots, pans etc. MANY of the accessories for Corsori, Instant Pot and many Air Fryers can be used in the Foodi – just watch the height carefully. Foodi’s pot is slighter wider and not as tall (based on manufacturer’s published specifications.
drafted updated 20-April-2019
April 20th, 2019 at 00:20 am
Caveat Emptor – this article may contain Affiliate Links, if you purchase thru those links,
I might be compensated but am unlikely to get rich anytime soon.
Ninja Foodi ™ Terms, Abbreviations and other stuff that may be helpful when discussing the Foodi Family of appliances in general and the “original Foodi” OP302 known in our home as Darth Vader, is the 6.5 qt which has claimed permanent counter space since December of 2018. it is a countertop kitchen appliance that combines the functions of an (EPC) Electric Pressure Cooker and (AF) AirFryer
TenderCrisp(tm) is the function name used by the Foodi for “most” AF functions that are preceded by use of the (PC) Pressure Cook functionality
Although I also have and used, since March of 2018 the Corsori C3120 2qt EPC – the following is “geared” to Foodi terms as outlined in its (OG) Owner’s Guide .
It is by no means complete, and may be somewhat out of date – your suggestions or questions for clarification are most welcome in the comments.
The OG Owner’s Guide is by not a complete reference but is very helpful and worth the time to at least browse a few time. Not to memorize, but to have an idea of where to look when you need an answer NOW
All the of the appliance I own do have their manuals on line and sometimes that is helpful for deciding which one is “right for you”
Tiplet – pull up a stool in front your machine with it unplugged, and go thru the Features and functions, touching the appropriate buttons to start to get oriented to all your new Kitchen companion can do for you.
It is my observation that easily 80% of the “technical” questions asked in the Foodi groups are answered in the User Guide. I strongly recommend you read thru the Owner’s Guide at least once or twice.
AC = Air Crisp is the Ninja Foodi term used on it original products for AF.
AF = AIR FRY(ER) is a counter top device that allows one to crisp / fry with very limited oil – Foodi uses the term “Tender Crisp” to describe it AF functionality
EPC = Electric Pressure Cooker – an electric counter top appliance that cooks food under pressure – There are many many brands of EPC, mine is the Foodi 6.5 quart model OP 302
NPR = Natural Pressure Release
(same as Natural Release below)
NR = Natural Release means to leave the steam vent closed until the pressure releases on its own. A complete NR, means until the locking pin drops. Tiplet: Note, cooking continues during what can be a longish process depending on the amount of liquid that has to cool from gas/steam to liquid
It is not unusual for there to be some residual = just move lever to vent
Tiplet I factor in the cooking that occurs for a full NR. It takes some trial and error, but has proven worth the effort (read that I get distracted and forget to come back ) It also has proven that I can reduce the PC cook time and thus energy costs by about 7% so I get to be lazy/distracted and frugal.
PC = Pressure Cooker a device that cooks food under pressure and raised temperature. May be either electric or stove top.
PIP = Pot In Pot. Food placed in a pot or pan that can be used either for less mess or “serial” meal prep – Although not exactly the same, the use of the Foodi Crisper Basket might be considered PIP, certainly those using baking accessories such as a springform, are using a from of PIP. I use PIP quite often.
QR = Quick Release
Open vent to release steam quickly – for safety it is recommended you use a long handle spoon to move the valve for QR. It is suggested and in my experience true, that QR should not be used for meats etc until you have done at least a 10 min NR (natural release) UNLESS specifically directed in a recipe from a trusted author.
Red (dot) Float Valve may stick even after full pressure release (and there are several reasons this happens) a very GENTLE tap with the end of a wooden spoon should cause it to drop and so release the lid
RR – Reversible Rack included with your purchase eliminates the need for the wasteful aluminum foil strip or the silicone slings that may be to tight a fit for the Foodi and thus interfere with both PC & AF functions. The Reversible Rack – somewhat unique to the Foodi – can serve as a trivet for large cuts of meat like a slab of Corned Beef. Or, as a Sling for easy in/out when using the PIP (Pot In Pot) Method
Tiplet There are two styles of Reversible Rack. The new double stack included with the latest version of the 8qt does NOT fit in the 6.5.
Trivet = the metal rack that goes in the bottom In the Foodi, the reversible rack that is included in your purchase can be considered a Trivet.
of your pot to keep food out of the liquid. This can be a separate item or Foodi owners will find the Reversible Rack rather handy for this function.
Trivet Tiplet There are two styles of Reversible Rack. The new double stack included with the latest version of the 8qt does NOT fit in the 6.5.
Water Test = accomplishes two things. First it gives you some “hands on” orientation for the PC function. Second, it often results in finding any malfunction or needs for you to more carefully seat the sealing ring.
This is by no means complete and as I said you suggestions for clarification or additions are most welcomed.
If you think I am wrong – Let’s Talk About It. I love hearing about others ides, opinions and experience.
If you are interested in accessories, I do have an Amazon page which includes items I have used or plan to try at
https://www.amazon.com/shop/wheatcarr
Please respect the effort that goes into putting something like this together.
If you think someone will benefit, please copy this link
https://wheatcarr.com/semantics/ninja-foodi-terms-more.php
not a cut and paste of the content to your own or in a group.
This draft was started 20-Apr-2019 and still need works.
Some updating was done in Late April 2020
April 16th, 2019 at 11:46 am
 My Ninja has a First Name:
it’s D A R T H
My Foodi has a Last Name:
it’s V A D E R
Oh I love to use it every day
and If you ask why, I”ll say:
Cause Ninja Foodi’s the best way
To make so many meals each & every day
the journey began December 18, 2018

