… For Ukrainians, who are primarily Orthodox Christians, Easter is the most important religious holiday of the year. Here is how they celebrate this holy holiday…
I have worked at adapting at least one of the foods used in Easter Dinner either in a counter top convection oven or, Since late December, using Darth Vader – my Ninja Foodi
Still some work to be done = perhaps by 2020
If you would like to read a bit about these food, there is a decent over view at
The Spruce Eats
Wheat Wrote WHAT?!Whatever Is On My Mind – Links for things I use: InMySmall Kitchen to EnjoyTheMaking |
||

| ||
» Currently browsing: Recipes
Orthodox Easter
Pretzels
In “real life” these are not as dark as they appear – who knows why –
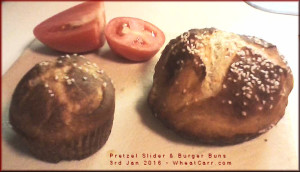
Like most, with New Year come thoughts of eating healthier – So long as you are not concerned about gluten – Pretzel bites are healthier than say chips.
And Pretzel buns make great sandwiches. So the search for a bread machine recipe – here is the tweak intended for the Bread Machine (Leaven) Dough cycle.
So because I needed something to do that would not be grossly affected by occluded vision issue today.
Recipe makes 24 Snack bites, or 8 slider “cupcakes” or 4 Burger size rolls
to try the different sizes, I did 8 bites, 4 cupcakes and two burger (except I kept some aside to try refrigerating and freezing “experiments”.) so only 1 burger bun actually done. The bites and 3 slider cup cakes did not last long enough to participate in my poor photography effort.
Bread Machine Settings: you will want the Menu/Program that Is usually used for “Dough” Or Some (KBS is one) “Leaven Dough” consisting of:
Stir (gentle – mixes ingredients,
Rest usually only a few minutes to allow liquid to reach all the dry ingredients
Stir (more vigorous – some might call it Kneading)
Rise (some describe as fermentation)
Total time is usually around 1.5 hours.
Ingredients
2.5 cup All Purpose Or Bread Flour
+ .5 cup “bread flour” & if needed for dough
2 Tbl Malted Milk Powder (Carnation or Ovaltine)
1 tsp salt
1 tsp sugar or honey
1.5 cup warm water (75-85 degree) NOT STRAIGHT FROM THE TAP WATER – Spring or Distilled is best for bread/yeast Or, you can “Age” your tap water by allowing it to sit on the counter in an open container for a few hours so before using so chemicals used in water purification like chlorine can evaporate.
2.25 tsp Bread Machine Yeast (if you try cake yeast, let me know how it works for you)
Boiling Liquid
8 Tbl Baking Soda (I used a 1.5 quart pot, with 4 cups of tap water that have been left standing for several hours to allow the chlorine to dissipate.
Here is what I did =
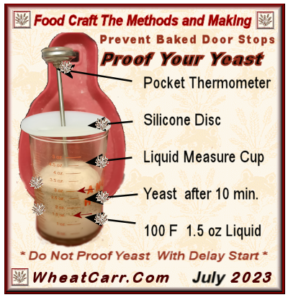
In 1.5 oz cup of 75-85 degree water,
add 2.25 tsp Bread Machine Yeast
set aside till bubbly
other yeast might work, but it is “what I had”
For the dough:
Combine in a bowl & lightly whisk to incorporate
2.5 cup All Purpose Flour
1 tsp sugar or honey (this feeds the yeast, no sugar subs)
1 tsp salt
In bread machine pan, add
1/2 cup luke warm water
yeast mixture – be sure to get all
Flour Mixture
Set to “dough” cycle – turn on and keep an eye on it – you may need to add a bit more water or flour to get a nice smooth dough.
This recipe is supposedly “no rise needed” just a 30 minute “rest” which sounds suspiciously like a rise to me,
while the dough is resting, prepare the bath – this is what makes it turn that nice pretzel brown with the excellent “shell”
In a pot, combine 2 Tbl Baking Soda for each Cup of Water
Continuously Stir till Baking Soda is fully dissolved
and water is simmering nicely
For bites, grease a medium to large size cookie sheet
(this recipe makes 24 – for Slider grease medium size cup cake tin(s) GENEROUSLY
for Burger buns, medium cookie sheet (I did try mini pie pans and do not plan to repeat that idea any time soon. I foersee making a combination of bites and buns, so plan to try the slider size on a cookie sheet next time
I was recently gifted with this set of dough tools from Nordicware along with the Breadtopia.com Sour Dough starter and the red one worked very nicely ![]()
Using a floured dough cutter or other tool of your choice.
For bites and sliders:
1. cut the dough into FOUR (4) “equal” they should each weigh about 4oz.
2. Then for Bites, cut each 1/4 into 8, and
or For Sliders, cut into 1/3rds
Or Burger rolls, divide the full dough (approximately 16 ozs or a bit more)
cut into SIX (6) equal pieces or fewer for larger rolls
Once all your shapes have been prepared it time for the dough to take a quick bath.
Drop each into your simmering Baking Soda solution, for 10 seconds, flip over and remove after another 7 -10 seconds. Place on a wire rack to drain
Using a REALLY sharp knife, or dough slasher or safety razor blade – make an X slash on the top of each shape and place on the WELL buttered baking pan.
Sprinkle top (or not) with coarse salt
Some may appreciate that my slasher of choice is the Sculpey Slicer with Safety Handle favored by those who work in Polymer Clay and/or otherwise are a danger to themselves (but the Kitchen blades will never meet clay)
While baking, prepare your favorite dipping sauce – we like to combine a 2-3oz of a melty cheese with a Tbl of butter and sometimes other flavors like garlic, or 1/4 tsp of horse radish.
My Amazon Affiliate link may provide a small commission at not additional cost to you for your merchandise should you purchase this this link
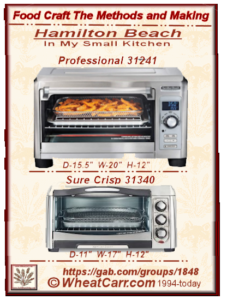
The Hamilton Beach Professional Sure-Crisp Digital Toaster Oven Air Fryer Combo, 1500W, 6 Slice Capacity, Stainless Steel (31241) This is the everyday – unless in progress for replacement (Heating Elements tend to burn out in HB products.
Place in preheated 375 degree oven of your choice until the brown you prefer.
For bites: approximately 10-13 minutes
for sliders: approximately 12-15 minutes
for rolls: approximately 14-18 minutes
remove to the wire rack and allow to cool for at least 3-10 minutes so not too soft and doughy inside
|
P.S. Cost of 4 Pretzel Burger sized buns in Stupid Market – $4-$6
Cost, including electricity $3.50 for 8 rolls
and they are fresher, healthier and lower cost – time is not an issue/cost/consideration since this is for “home consumption” and I like to prepare food
|Caveat Emptor: we purchased the smaller HB Oven Model 31340 “because it was on sale, had a coupon and the Larger one was failing. It toasted fine, BUT, the shelves are very tippy – we would not buy this again. The Pro, when it is working correctly (FYI the probe never has worked correctly, but I can live with that) In the last few years several NEW machines from HB have had a similar problem with the heating elements SUDDENLY not functioning and thus temps fluctuate as much as 100F and as little as 50F.
Fortunately we purchased the extended warranty. It uses about 20% less electricity than the Stove Oven and holds a 12 in pizza and up to a 12×13 pan with no handles and room to breath or allow air circulation/convection as the case may be.
I ALWAYS recommend shopping locally for ingredients. If you need to see what “they look like” well-that is the main reason for my Amazon (affiliate) Idea Lists and yes, if you use them to make a purchase, I may or may not receive a commission.
Wheat’s Amazon (affiliate) Idea Lists:
– Bread and Dough https://amzn.to/3wUoNi9
– Ingredients https://amzn.to/48X13Ht
updated a bit: 2023-Dec-19
updated a bit: 2024-Feb -15
Menu Planning – when reducing the recipe just does not work
 For a variety of reasons, not the least of which is an increased sensitivity to certain additives (soy, corn sweeteners, sulfates, etc) as well as necessary dietary restrictions; I have been “experimenting” with making down sized recipes – not an easy task for someone who spent time after college in banquet kitchens, so more comfortable prepping for 20 to 2000 than for 2.
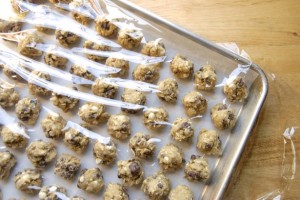
Freezing is the easy answer for entrees often an answer when it is just too complicated to really down size a recipe and desserts are a rather different set of challenges.
As a life long fan of breaking down a task so that it can be done in small bits – I have always “pre-measured” and then stored dry ingredients of many “basic” recipes. Some, like pie crumb & Pastry shells, even lend themselves itself to freezing. (by the way, I highly recommend the use of Vanilla powder over extract for just this reason.)
Some ingredients do not lend themselves to freezing and so can’t be included in the assembly line plan. “fillings” are often there and I doubt Marie Calendar is going to share her tricks with us.
That just leaves the filling and good as my desserts might be – no one really want the same one for a week straight so it does not ‘go bad’. AND sometimes one wants more variety to satisfy “everyone” (cheese cake flavoring would be an example)
So I was happy to see apparently the writers of the King Arthur blog have been getting signals from my brain – so not exactly what I “need” lots of helpful ideas in their blog today Freeze & Bake Tips and the little added gem about what freezes well or less weel was “hidden” in the comments so there may be more freshly baked bread and calzones in the monthly menu –
Enjoy The Making
Wheat
Crumb Crust Recipe
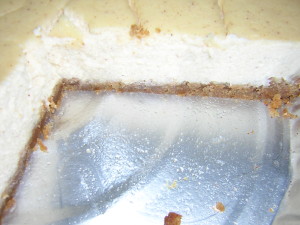 I probably should start by mentioning I am have chronically low blood sugar (hypoglycemia) and even more chronically low cholesterol. TH is diabetic, so we usually only allow ourselves a small slice in the evening –
Basic Cracker Crust:
nicely fills a 9 inch pie pan or the bottom of a 10 inch spring form
Ingredients:
1.5 cups finely crushed Graham Crackers or “Digestive Bisquits” or some cookies –
if you don’t get them fine enough – the crust won’t hold together – I have not had good experience with cookies with chips that melt (they burn) and nuts (can’t hold together and often to coarsely ground) so suggest saving chips and nuts for filling and toppings
Important quote: “If you won’t use butter, I can’t help you” Anthony Bourdain
6 Tbl Butter – Melted (lightly salted is fine – if unsalted, that will be fine too
1 Tbl Butter – Softened – use to grease pie or spring pan – not needed if you make the cupcake variation using cupcake papers.
—-
1/4 cup Honey – I tend to like things less sweet so use Honey rather than sugar because it takes less to get the same amount of sweetness – this also helps keep TH’s blood sugar in acceptable limits.
Someday I hope my Bee Keeping friends will send me some of their “flavored” honey to try for flavor variations. But for now, I just use a plain honey from a local keeper of bees.
—-
—— Your Choice COMPLETELY Optional —–
1/2 tsp of the flavor of your choice
My opinion is that the world is a better place with the addition of ground Cinnamon or a rich dark Cocoa powder or both.
— other choices might be – Vanilla Powder – and a recent addition to my flavorings – True Lemon, Lime & Orange Powder – These are great for when the filling is also Citrus flavored.
___
1. Generously Grease Pan of choice
2. Combine Cracker crumbs, Butter and Honey until all crumbs are moist.
3. Press into the pan of choice (pack it as tightly as possible)
4. Bake at 350 F – 8 minutes
5. Remove from oven and “smash it down” while still hot
6a. Use it today: Return to oven as quickly as safely possible and bake an additional 3 minutes
7a. Set aside – okay if it cools and if you like can also be refrigerated if you needed to get the crust done as a partial bake ahead.
8. Prepare Filling and bake according to filling directions.
6b. Freeze for later: allow to cool completely with pan on a rack –
bag/wrap in plastic and store in freezer up to 1 month. (more works, but not sure how it will affect final flavor.
I often make several and “stack” them for storage
cool in refrigerator until well chilled, wrap tightly
7b. Remove from freezer and allow to completely defrost.
=== if you plan a “no bake” filling like chocolate mousse – Preheat over to 350 F and bake about 3 minutes.
8. Prepare Filling and bake according to filling directions.
=== if you plan a baked filling – no pre bake needed.
Notes:
Fully prepared can be tightly covered and stored in refrig for several days without adverse effect on flavor
If you plan to freeze the shells, it is okay to omit the additional flavor and then use the same smaller amount to lightly dust the shell prior to adding filling. Lightly dust should be no more than the amount you would have added to the shell before baking .
Crust can be baked on a sheet pan and while still warm cut into shape to line the bottom of a cupcake paper or even smooshed into the cupcake liner and baked in your cupcake tin.
A neat dessert sampler can be made using the mini-cupcake papers and tins – with the basic recipe and then flavor dust – topped by the flavored filling (yes recipe to come)
again these freeze well, take less than an hour to defrost and the minis are also great semi frozen with a dollop of ice cream, or gelato.
last edited 2015-Sep-06
Ingredients: Honey 101
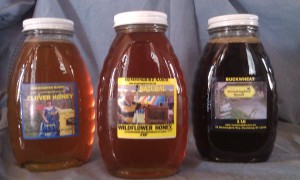 Part of my thinking about the economics of relying on Food Stamps research – has me going down the path of “ingredients for healthier eating on a tight budget”
My father volunteered in one of the programs when our government thought it was more important to feed its citizens first and enemies of our country second, there was a “food share” program where ANYONE could go, once a month, and buy a box of basic stuff. It usually included a quart of honey. Since those boxes included some perishables, he always came home with at least one purchased box and some of the perishables that would not keep until the next distribution day.
The Public library (dark ages no internet – in fact no such thing as home computers) had a good selection of cookbooks and I found quite a few recipes that used Honey and the other ingredients in those books. My brothers thought honey research was a great hobby. Junk food was not in our family budget – home made desserts were a treat.
Here are some things I learned then and some I am still “thinking about now – five decades later.
Many recipes suggest that Honey can be subbed one for one (1 cup Honey to replace 1 Cup Sugar) I disagree.
Keep in mind that Honey tends to make a strong flavor statement – so a lighter hand is often needed, particularly with fruit of any kind. The obvious benefit is less sugar/carbs added to the diet. Second, if the goal is to add sweetness only, then you can usually reduce the amount of honey by at least 25 percent.
One thing I can say is that I find Honey, once you get the proportions “right” adds a depth of flavor I have never been able to achieve with either processed or raw sugar.
Honey is hygroscopic, meaning it absorbs moisture. This is a huge plus for most baked goods because “moist” is usually a desirable attribute.
Crispy toppings, like the crumbs on your fruit pie or cobblers, you may need to either reduce the butter, or increase the dry ingredients (I vote for more topping – bad as it might be for me) Still working on this one.
Honey browns more easily than Cane Sugar – you may need to reduce the oven temperature. How much varies depending on the food being prepared. Experiment or and always check the progress frequently.
I have found that reducing temperature by 25 degree F is a good place to start – still ovens vary – it may take more than one try to get it right. You will likely also need to adjust baking/roasting time – keep and learn to use a good temperature testing is a must have for your kitchen.
A cup of honey contains approximately 1/4 cup of water; this means that you may need to reduce other liquids in your recipe proportionally. In some recipes, you will need to reduce other sources of moisture (fat, water, milk, etc)
With Diabetic (not enough insulin produced “naturally” so high blood sugar, etc) and a Hypoglycemic (too much insulin – low blood sugar leading to other issues) we both need to keep a sharp eye on the amount of sugars and carbs we consume.
If you have medical conditions, always consult your primary or specality physician before making changes in your diet. Honey is said to have about 20% more calories (approximately 22 per teaspoon – “white” sugar is estimated at 17 – since you will use less Honey in most cases, it is probably about even.)
It has been our experience that high fructose corn syrup is at best a problem and at worst a HUGE problem. Lots is being written about many of the artifical sweeteners, and setting health issues aside, I just can’t stand the aftertaste. Perhaps needless to say, I spend a LOT of time reading labels.
According to the information from NIH (National Institute of Health) at http://www.ncbi.nlm.nih.gov/pubmed/19817641
Honey might be a better choice for the type II diabetic. So long as care is taken to use the same degree and care for it as a diabetic would for Cane Sugar.
Our doctors have always told us that if we find something is the factor causing trouble – then the smart money avoids that ingredient.
Thanks to learning basic skills, a willingness to prepare experiment or two, often superior dishes are easier to make acceptable,
What I have not yet completely worked out is the cost comparison. And, a source for “crystallized” honey (or how to do that myself) so I can do more experimenting
I am hoping life long family friend Richard Focht of Hummingbird Ranch and my other beekeeper friends will be able to help me out with the sourcing or, I will have to “make the rounds” of local beekeepers and see who has what – starting at my favorite local farm stand. Then it will on to Maple Syrup – one of the few candy flavors I have difficulty resisting.
Do you use Honey in your regular diet? Any recipes to share?
- Pages:
Theme:
Wheat-Red-XEmail Delivery Its All Just String
- Amazon Enjoy The Making
- ASTM
- Carol Hummel
- Craft Industry Alliance
- Deb Robson
- Dr Who Scarf
- Facebook – ItsAllJustString
- FB Group: Braids Beaded Kumihimo & More
- FB Group: Kumihimo Classified
- Find A Yarn Shop By Zip Code
- Hollis Chatelain
- ItsAllJustString.com
- USDA Food Safety
- Yarn Label Reference
- Yvette Stanton-White Threads
Food & Kitchen
- 24Bite
- Amazon All Idea Lists
- Amazon Enjoy The Making
- Atlantic Spice Company
- Central Iowa Norwegians V-3
- Convert Cake To Different Size Pan
- Culinary Math
- EverythingKitchen
- FoodKeeper App
- Hamilton Beach
- Hamilton Beach Manuals
- Instant Cart Referral
- Janet A Zimmerman – Amazon
- Kenzie Swanhart
- Kenzie Swanhart – Amazon
- Mt Mansfield Maple
- Ninja Foodi FD400 Series
- Ninja Kitchens – Amazon
- NinjaKitchens.com
- Urvashi Pitre – Amazon
- Urvashi Pitre – TwoSleevers
- USDA Food Safety
- WestBend Manuals
- Xylitol-Birch Sugar Unsafe
Satisfied Customer
Wheat Wanderings
Space Junky
Affilate/Ambassador Links
In My Small Kitchen
GAB
Recipe Resource
- 24Bite
- Amazon Ingredients
- Breville = The Custom Loaf
- Convert Cake To Different Size Pan
- Culinary Math
- Hamilton Beach Manuals
- KBS-Bread Maker Time-Chart
- Kenzie Swanhart
- Kenzie Swanhart – Amazon
- NF: Chocolate Flan Cake
- Ninja Foodi FD400 Series
- Urvashi Pitre – Amazon
- Urvashi Pitre – TwoSleevers
- WestBend Manuals
Research Resource
Bread-Making
Ingredient
Recipe In Progress
Genealogy
Meta
-
Wheat Supports:
