When do it will depend on which cycle you are using – but generally after the last stir for that cycle.
In the guides (look at the top of the page) is a link to download a PDF of the “time/work sshedule”
My method:
-Consult the time/work schedule to estimate when the last stir/knead cycle will complete. Set a timer.
Prepare a plate or bowl, lightly greased is helpful
After the last stir/knead Cycle,
we get to take advantage of the feature “Power Interruption”.
You now have plenty of time to remove the pan,
(close to the lid to retain temp inside)
DUMP the dough onto lightly greased plate or bowl
Remove the paddle (you might have to dig it out of the dough or if you are lucky, just remove frm the spindle.
Replace the dough in the pan.
Open the lid and lock in the pan.
Lower the lid,
PLUG THE MACHINE BACK INTO THE OUTLET
(all caps because, well because sometimes I get distracted and have to learn things the hard way)
With planning and focus, this is really easy (tricky was when I had machines without the Memory for Power Interruption)
Honestly it takes longer to type the method than to do the removal.
Note: you really want to get it done as close as possible to the beginning of the last rise as possible – and as quickly as possible to retain as much heat as possible. Worst case, you may want to add a bit to the bake time.
IF you have an exhaust fan in your kitchen turn it on to help with fumes. put about 1/2 cup of water into the bread pan. Bake 20 minutes. This “Should” help soften the burned on dough.
UNPLUG and open lid for a few minutes until you can touch the warm pan safely.
Remove the pan and first try to remove the burnt on dough
This concept has also worked well for things like my Ninja Foodi
It it sort of like deglazing a hot pan
Just a reminder – this tiplet is a work in progress – your thoughts, good bad or indifferent are always welcomed!
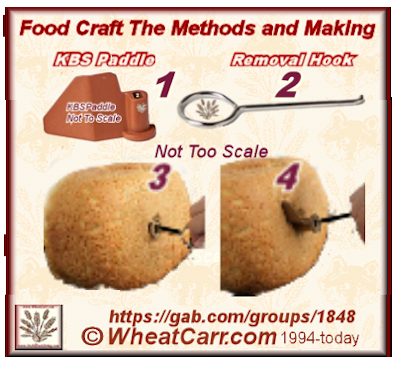
When to remove the paddle is an often asked question, and the answers vary. So much so that it really needs its own blog. Meanwhile, the possibly most asked question is how to remove a “stuck” paddle.
Always best to try avoiding the problem, but if it does get stuck… The following may help. As shown in the illustration, Many brands include a “tool” to remove the paddle from the inside the bread after baking. This tool should never be used to attempt to remove a stuck paddle from inside the pan. Metal tools, can and will for those who ignore this advice, damage the ceramic finish, the paddle or both.
The answer is an ounce of prevention. If removed from the machine before baking (beginning of last fermentation period) it cannot “burn on”
I (currently) use a brush intended for cleaning reusable straws. The straw cleaning brush helps to really clean inside the paddle. I have the Dawn Hydration Cleaning set – best price usually in your local stupid marketing their gadget aisle. It is also important to clean the stem so any residue does not cause an issue that may make removal before baking problematic
This is an Amazon Affiliate link so you can “see what it looks like” During the bread making process, after years of practice; I learned to remove the paddle just before the last rise/fermentation, remove the dough from the pan, then quickly remove the paddle, either from the pan, or from the dough ball – which ever it decided to stay.
Thanks to the KBS “Power Interruption Feature” This can safely and much more easily be done today by disconnecting the power, dumping out the dough ball into a ball. Removing the paddle from either pan or dough ball. Replace the dough ball, plug the machine back in, and the machine will continue with the program you selected. My “best time” is about 20 seconds, but according to KBS this will work for up to a 15 minute interruption.
If you are a member of the set it and forget it club… and the paddle stays in the bread – Insert the removal hook (2) into the base of the paddle in the bread (3) and the manual then tells you to gentle pull (4) until it slides out.
Again from experience I have a step (3-A) (someday I’ll make an illustration – that day is not today.)
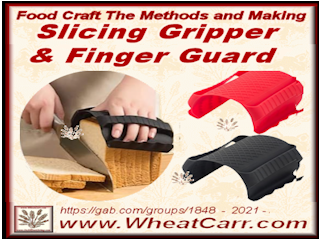
(3-A) Using a Clean oven mitt or Kitchen Towel and maybe this new gadget that Caught My Eye1a few days ago… Hold the loaf (because it is best to do this while bread is still almost hot) Gently pull the hook so the paddle is slightly raising the crust, with a sharp pointed paring knife, CAREFULLY cut a slit along the edge of the paddle. NOW it should come out of the bread with much less damage.
Don’t forget to cool the bread completely before placing in any type of storage bag, box, whatever, to avoid condensation.
This is a draft – so use at your own risk, however, your comments, critic and suggestions are more than a welcome – Thanks for reading.
Possibly the 2nd most asked question in any bread making group is for a Gluten Free recipe. Not my issue, so have not tried… yet … never say never.
A member of the KBS group I had been helping build, reported (after trying several recipes) that this one worked for her. Using a KBS dual heater model (I think it was the MBF-011 but will check and edit if needed.
As the owner (as in bought it myself) and having had the opportunity to test a number of brands and models; It may need some tweaking for your machine, but seems like a good place to start:
Note, The link may contain contain affiliate links, but not mine. Use At Your Own Risk original post: 2024-02-18 WWW & Gab: Food Craft – Making and Methods
Yes, no matter what you do, home baked bread does go stale sooner than “store bought”. That is why it does not matter what bread baking group you read, one of the most commonly asked questions is how to keep it from going stale.
Caveat Lechtor: The following contains Affiliate links. Use of these links may pay a small commission to me such payment does not affect the price you.
First the Reality Check: Most if not all Bread Bakers will tell you how wonderful it is to have bread that does not contain unnecessary chemicals. As often as not, the same folks will ask how to keep their bread from going stale. The answer is to add chemicals – in other words you cannot have it both ways. And certainly unless you accept this reality, you honestly might be happier buying store brand white bread.
Having accepted this reality, based on my 60+ years of bread making, my primary solution is to bake smaller loaves and to do so more often. I cannot begin to tell you how many different ideas I have tried with varying degrees of limited success. If you have something else that works for you, I am happy for you. But for me and likely among the top reasons I am so very happy to have found my KBS MBF-041 since its Tall/Tube Pan makes 1 lb loaves work really well for just us two for either sandwich, toast or dessert type breads.
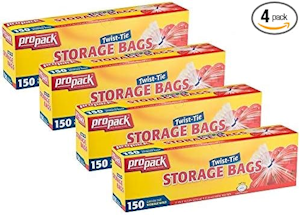
Consider using these plastic bread bags for “breaking down” things like value packs of protein and for bread storage. This “buy” has average been sufficient for about about a 24 month supply. Their size (approx 11 x 12 inch) works well for my 1 and 1.5 lb loaves of bread. Twist tightly and use twist ties to seal for storage in refrigerator or, to place inside a freezer zip loc. Why inside a second plastic bag? Because I reuse the freezer bags – more about that another time. Sometimes just for bread or meal sized portion and some times for all the ingredients for a particular recipe with each ingredient in its own “flap” type sandwich bag. My greenish compromise.
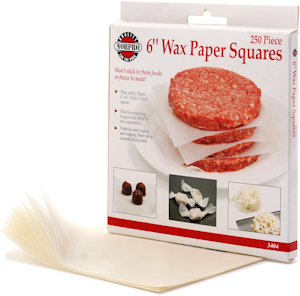
The most common reply is to wait for it to cool completely (and to that I would add – that means several hours on the counter – which on those rare occasions when I plan to freeze bread like objects) Place in a plastic bag and let it get really cold (overnight) in the Refrigerator. Then Slice and place in sandwich bags with a “burger wax paper” between the slices.
I usually put two slices per bag in case of a grill cheese emergency, with a single slice of was paper between the bread, and another to separate the bread from the cheese (also in the sandwich bag)
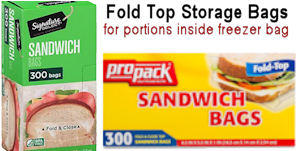
Another of my “compromises” is the use of the least expensive fold and close type sandwich bags. Usually the best price is to keep an eye on your local stupid markets store brand in 300 ct boxes. Note, I do not reuse for food storage.
With my system for reusing larger gallon sized freezer zipper bags, there is no need to use the triple the price and the plastic zipper type for the individual sandwiches. (end of earth day quasi lecture) So you can “see” what I mean, If you are the type to go for bulk buying (as with all things Amazon) often at a higher price – this is a link to one of the better priced bulk buys. Note once again, check you local stupid market for the best price.
Tiplet: Freezing anything: Unless it comes in the door frozen, ALL food spends at least over night in the coldest spot in my refrigerator.