» Currently browsing: Crochet Tutorial
July 16th, 2013 at 12:53 pm »
Comments (2)The first step in any project is always the planning and when you are working without a net (I mean pattern).
 There can be either devils or delights in the details. for this project I tried (but did not succeed) to limit to yarns in my stash and further limited my choices to those presently showing a good amount of stock at the KFI and Euro Warehouses.
Queensland Rustic Tweed: 63% Wool, 27% Alpaca, 7% Acrylic, 3% Viscose blend with approx 318 yards per 100gram
Ella Rae Superwash Classic 100% Wool with approx 220 yards per 100g ball.
Ella Rae Cozy Soft Solids 25% Superwash Wool, 75% Acrylic with approx 213 yards per 100g.
Like all fashion products, it can certainly be gone tomorrow, but at least it is here today. As you can see, this time I got lucky, yarn choices are always an issue of availability. Might not be easy next year, but at least today I know the ones I am using “have stock in the warehouse” so I should be able to yarn requirements estimated
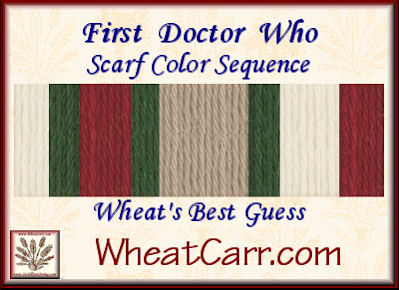 Last night I did this “digital” color stick – To lay out the color order and proportional width of each strip using the color swatch from The Ella Rae Superwash Classic. A color stick is used by designers to plan color sequences. When planning a sequence, it is basically the same as wrapping a ruler to determine the WPI (wraps per Inch) To get started, loosen about a yard of yarn from each skein adjusting the wraps to get the visual proportion you think best for your project. I like to start with the widest stripe.

In the Blastr photo, it appears the taupe is about 2 inches wide or a tad more. The Cream/Natural and green – although different, look to have a consistent width and the red appears to have both a narrow and a medium
Tonight I will make stick using the sequence and proportions based on “eyeballing the photo”
The photo version looks to be a simple garter stitch, so I will need to decide on crochet stitches (standard and tunisian) that will give a similiar textural appearance. It may be take a few evenings to get a good combination. For most project I would then make larger swatches so one can be washed according to the label instructions to be sure the texture and drape will hold up under normal human conditions.
For scarfs, instead of the larger swatch, Ms Barbie (she is the 36 inch tall variety – you may have met her a few years at go at TNNA) will get a 1/2 size version – her twin Ms Bink will too and it will be washed washed according to the label instructions to see if any adjustments will need to be made to the Pattern Gauge.
This step might take more than a few evenings but as long as the AC holds up, who cares if the heat index is 110 outside.
P.S. Please feel free to share a link to this page – however, I prefer you do not copy and paste to another site. Among the reasons for this is that I update when I find newer/better information to include. Here is the direct link:
https://wheatcarr.com/dr-who/dr-who-the-new-guy-scarf.php
P.S. Jr. Caveat Exercens: The information contained in this blog post is based on the opinion and experience of Wheat Carr. These instructions may not be suitable for use by children of any age. Parental supervision and judgement should be exercised. My results are not a guarantee of future performance or your results especially when gauge is involved.
This blog post was created by/for WheatCarr.com July 2013 as a Whovain Fan and is not intended for commercial use. The Doctor Who brand is a trademark of the BBC. No infringement is intended or implied.
May 20th, 2013 at 08:08 am »
Comments (1) If the question posed in the Tunsian Crochet group had asked about converting Crochet to Knit or Knit to Crochet, a polite referral to my blog article in 2007 would have been the short answer. Well really No, would be the short answer, but the link would be next most brief
Instead, the question asked was about “regular” to “Tunisian” crochet and since they are both crochet – it is more doable with a reasonably positive result.
Caveat Emptor, I do sell Crochet related books, quite a few actually, just not all on line at the moment. And yes I do sell mostly Technique reference and some patterns were I like the way the patterns are written.
Please understand, the reason I sell them is because I use them. I use them as a starting point for EXACTLY the type of project you are asking for.
If the only thing about the pattern you like is the “shape” of the final garment, then your plan might be okay. If it is the texture and/or the hand of the garment or any characteristic related to the technique used, then it may not be satisfactory.
In a teaching/consulting situation, I would be asking you why, if you know both, you want to do it in another technique How you answered would/could lead to whole different set of questions and answers. If you would like to continue this type of discussion, let me know in the comments.
When I see a project in a technique that is not the one I want to use, In this case Pattern in Crochet and you want to use Tunisian,
I would start by doing an “IN PATTERN” Swatch in the original pattern’s technique. Then see if it can be easily duplicated.
In this case, it really should be not all that difficult to almost duplicate the SC, HDC alternating motif you describe. You will only need to pay close attention to your Yarn Over’s (YO) in the forward pass to be sure you have the loops need.
For a more complicated stitch motif, next stop would be the shelf with all the technique references and “find the stitch motif” that duplicates or comes really close. You might not be surprised to learn this shelf has a very comfy chair, a place for my coffee cup and a good supply of graph paper and coloured pencil for design and gel pens for outlining and of course various sized hooks and yarns for swatching.
Once you find a motif that fits your needs, you will need to swatch with the actual yarn and various sized hooks until you get the gauge needed for the hand of fabric you prefer.
I need to thank Marisa for her question, it helped me to get a good start on explaining a concept I hope to explore further in my blog in the coming months.
Enjoy The Making
Wheat
Shop: http://www.ItsAllJustString.com
Like: http://www.FaceBook.com/ItsAllJustString
Edit note: Thanks to Ann McClure for finding my typos, proving yet again editors need editors and proof readers too
March 31st, 2013 at 10:06 am »
Comments (3)There are more possible ways to start a project, but the two most commonly know are the “tradtional” Base Chain
Base Chain, aka/ The Base Row From Hell, is something to get past. It causes everyone issues from time to time and probably is responsible for 90% of those who give up on Crochet. You may not be surprised to find that I do not think using a large hook for the chain is a good solution. IMNHO it creates more problems than it solves and makes a sloppy edge – but if it works for you and you are happy with the result who am I to judge?
As an alternative, many of us use Chainless Foundations whenever possible, there are situations when it is not right for the project (thankfully not too many ) There exceptions to the following, but fewer than you might thing – so relax and learn to enjoy the anticipation of getting past the base chain.
But whichever method you choose, a traditional Base or Foundationless chain, be sure to leave a “Tail Marker”
Somewhere along the line I began using the phrase “Tail Marker” Later, in an attempt at discretion “Kite String” – although either can be appropriately descriptive, depends on the age and life experience/attitude of the student – trust me one has to be aware of possible urban connotations when volunteering in an inner city after school program or lots of other places – although the gentleman at the VA did find it amusing when I keep telling then not to forget their piece of tail)
Whether you must use a Base Chain or can use the Chainless Foundation, START with a Chain that is longer.
How much longer will depend on the project and your planned finishing style. If you are working a traditional base chain, it may not be the end of the world – still, if you counted wrong, you don’t have to rip back to add more. When one compares the cost of a yard of yarn with the value of the time to rip and rework – it is an excellent trade off
When the project requires the use of a Base Chain I always make the chain long enough to support at least two or three motifs. So if the Motif requires 6+2, I will make the chain at least an extra 18 or so links.
Aside from counting wrong for the pattern, because of variation in personal gauge, you have feel at the end of that first row it really needs to be a motif or two wider
The excess links now serve as my “marker” for RS/WS – Right Side/Wrong Side aka: FS/BS – Front Side/Back Side .
Determining RS/WS, often difficult for those who crochet, as the work may appear the same on both sides. It is very helpful when a project has been set aside. With the TAIL MARKER, you have a quick reference to get restarted in the correct direction.
It does not matter if you are left or right handed, the principle is the same. The Tail Marker should always be on the same side – since I am mostly right hand dominant, the tail will be on my LEFT when the Right side is facing me .
The CHAINLESS FOUNDATION
For those who may have difficulty with CHAINLESS FOUNDATION “counts” the Tail Marker serves to make it much easier to see where the first stitch of your Chainless work begins.
Once you have the concept that the Chainless Foundation is both your BASE CHAIN and YOUR FIRST ROW , it becomes easier to grasp that you now work a turning chain as directed in your pattern at the end of the direct row, turn your work and continue.
If you enjoy experimenting with stitch motifs squares worked in the round, the Tail Maker will help you to avoid accidentally placing the “wrong” up as you
When working in the round, as one does for Grannie Squares, the ” Reverse Tail Marker” is made by leaving a tail at the lower corner. How long that should be will depend on what you have planned for “connecting” pieces of your work/project. A Short length of yarn can be used to connect corners – a hand technique in some thread or scrumbling work.
For example, when ready to assemble squares I often use either the illusion of Stained Glass or Attic/Cathedral Windows blocks. To do this each round is usually finished with at least one row of single crochet. By leaving enough yarn to then use my favorite join, that of using a modified SC – Single Crochet, I don’t have to add yarn – which means one less Russian Join or one less knot and end to weave.
I hope you will find the use of a KITE TAIL MARKER helpful whatever style of foundation you choose.
Always Remember The Point Is To Enjoy The Making
Wheat
MAIL: Wheat@ItsAllJustString.com
Read: Wheat Wrote WHAT! http://www.WheatCarr.com
Shop: ItsAllJustString.com http://www.ItsAllJustString.com
Like: FaceBook – http://www.facebook.com/ItsAllJustString
February 17th, 2011 at 09:02 am »
Comments (0)
Recently someone on Crochet Partners mentioned using a skein of Flounce type yarns to make a quick gift scarf.
I neglected to note the name, so hope whomever has some experience with this yarn, would pipe up and share any tips, ideas, or even challenges you found but maybe did not yet overcome. With several variations of this yarn beginning to arrive, I am hoping to finally do something for me
And to be able to help those who are intrigued by the yarn as well.
Thank you in advance for any help
Wheat
January 18th, 2010 at 00:01 am »
Comments (1)Keeping a starting chain, “untwisted” is always something of a challenge
Keeping a LONG starting chain untwisted is a bigger challenge.
While not perfect, and it does require a tiny bit of planning and that you read and understand your pattern, here are my most used options.
First (and the one I use “most” of the time) I make the starting chain plus about 10-15 extra chains,
Now I IGNORE the instruction to join the chain, instead, work the first row according “as if” your chain was already joined to the nest to the last stitch.
Obviously you will need to be careful as you work that row that your chain does not get twisted, but even it does the world won’t end.
Instead, very carefully wrap that chain around something (coffee cans seem to work well for me) to straighten the chain and make sure this chain plus row 1 are not twisted.
It should now be much easier to “see” that your work is not twisted and you can “join” that first row “as if there were a chain underneath.
Although you don’t have to, it may be less awkward at this point to secure that last/joining stitch with a stitch maker and remove you hook.
OR you can wait until you have worked further rows to make it a bit easier to hang onto (again, this is what I do)
Unwork the extra chains,
which also btw eliminates the perceived problem of too many or not enough base chain stitches,
Use the yarn tail to weave a Kitchiner or even a Russian type join of the base chain ends –
Finally reinsert your hook (for in the round leave the stitch marker in place) and continue on with your untwisted, non-mobius hat, sweater body or pillow covered or purse.
Speaking of the tail created by those extra chains, it does have some other saving graces/uses.
I “force” myself into certain habits, even though I can crochet or knit with either hand, I ALWAYS make sure that the chain row is some from my left to my right.
That way I “always” know which side is the “front” because the chain is on my left of a flat piece and my right for an in the round.
Incidentally, with a bit of variation the above also works for starting knitting in the round
Hope This Helps