» Currently browsing: Braids & More
March 21st, 2016 at 09:22 am »
Comments (0)Some okay much of the confusion about Japanese braiding terms is the direct result of two things.
First, It is often nearly impossible to make a direct translation to a word commonly used in the English Language. This applies to much more than braiding. This is not unique to Japanese – some of my most interesting moments in craft “translating” have involved Russian, Ukrainian, Polish and German.
So, the challenge to authors and teachers focusing on the “English as a first or even second language was to use terms that would make sense to their audience.
Which brings us to the second reason there is so much misunderstanding.
Authors like Tada, Owen, Carey, Berlin, et al – were, for the most part “speaking to fiber people” NOT Bead people. Japanese craft more than most has very unique words for each part of the process, the tools and the materials used.
The result is the mis-use of terms by those who may not have a solid understanding of fiber craft related terms in any or perhaps only in their own native language.
Then, there is the InterMyth factor – a term gets used by a “popular” person and then it gets repeated and pretty soon it is treated as “fact” when really it is the direct result of misunderstanding/lack of knowledge. Not helpful to those who wish to learn beyond the simplest or easiest.
I know that not everyone is a OCD as I may be, although I never ‘filed’ the papers – Setting aside the professionaly taught classes for “the basics” I also spent several years working my way thru each of the HGA (Handweaver Guild of America) COE (certificate of excellence) requirement so I would better understand when those more advanced than I were “talking” Not a path for anyone but then few people have as many college credits as I do because I never cared about a degree – just spent money taking courses of interest to me to advance my knowledge base for a subject.
My personal goal is to help those with a desire to know more but may not have had the advantage of studying other craft to know enough to facilitate their quest for more knowledge and expanded skills.
Once the AKS (American Kumihimo Society) goal of an online wiki for just this purpose – I suppose my work will not be needed. But in the meantime I hope you will join me on this journey and that it will help you to
Enjoy The Making
Wheat
March 10th, 2016 at 11:30 am »
Comments (0)
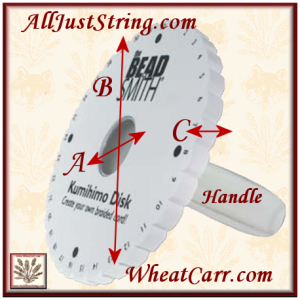
ID=A – Inner Diameter OD=B – Outer Diameter HT=C – Height / Thickness
| Brand Name |
SRP* |
Size |
Handle
Fit |
Center_A
ID_Inches |
Center_A
ID_MM |
Disc
OD_Inches |
Disc
OD_CM |
Disc
HT_Inch |
Disc
HT_MM |
| BeadSmith DD * |
5.00 |
Large |
yes |
1 1/4 in |
35 mm |
5 13/16 in |
15 cm |
0.75in |
20mm |
| BeadSmith DD Mini * |
4.50 |
Small |
yes |
1 1/4 in |
14 mm |
4 3/16 in |
10.6 cm |
0.75in |
20mm |
| BeadSmith SD * |
3.38 |
Large |
yes |
15/16 in |
14mm |
5 13/16 in |
15 cm |
0.375in |
10mm |
| BeadSmith SD Mini: * |
3.18 |
Small |
|
15/16 in |
14 mm |
4 3/16 in |
10.6 cm |
0.375in |
10mm |
| Beadaholique: |
5.49 |
Large |
no |
7/8 in |
12 mm |
5 7/8 in |
15 cm |
0.3125in |
8mm |
| Beadalon |
3.19 |
Small |
no |
15/16 in |
14mm |
4 1/4in |
10.8 cm |
0.375in |
10mm |
| Beadalon |
3.99 |
Large |
no |
15/16 in |
14mm |
6 in |
15 cm |
0.375in |
10mm |
| Dazzle-it: |
3.99 |
Large |
no |
15/16 in |
12 mm |
5 7/8 in |
15 cm |
0.3125in |
8mm |
| Fire Mountain |
3.52 |
Small |
no |
7/8 in |
12 mm |
4 1/4in |
10.8 cm |
.3125in |
8mm |
| Hamanaka: |
10.00 |
Large |
no |
15/16 in |
14mm |
5 7/8 in |
15 cm |
.4375in |
12mm |
| Sally Battis: |
8.00 |
Large |
no*** |
1 1/4 in |
35 mm |
5 1/2in |
14 cm |
0.75in |
20mm |
| Toner 4-pk |
6.99 |
Small |
no |
3/4 in |
20 mm |
4 1/4in |
10.8 cm |
.3125in |
8mm |
| Weir: |
3.95 |
Large |
yes |
1 1/4 in |
35 mm |
5 1/2in |
14 cm |
0.4375in |
12mm |
| |
|
|
|
|
|
|
|
|
|
With thanks to Carolyn910, BeadSmith, and Sally Battis for providing some details. And BeadSmith for written permission to use their images.
|
| * SRP is the advertised Suggested Retail Price – last updated 2016-March-10 – Always check your seller for most recent price. |
| ** Prior to 2015 BeadSmith SD discs has 25mm center – this do not fit the BeadSmith Handle – price used is with instruction for 8 and 16 Round Spiral (Japanese Name: Kongo Gumi ). |
| *** Sally Battis disc has a beveled center opening on the bottom. As a result, although the same Center hole ID on top/numbered side, it likely will not support the BeadSmith handle. |
Comments, additional details, questions, corrections always welcomed
If you would like to see the line of BeadSmith Disc for Braiding
visit our e-store by clicking here to see our products and pricing
September 1st, 2015 at 04:42 am »
Comments (0)I cannot emphasize how thankful I am to Anita Clark – I tend to write “as if we were in the same room and having a conversation”
With her help – this version has better grammar, several errors corrected and still, I think, retains the flavor.
Combined with the Fill the Gap Set Up & Movements.pdf – these are likely all you need and perhaps even more than you wanted to know about this easy and versatile braid.
You may download these complimentary files in our Facebook Group by joining us at:
Braids Beaded Kumihimo & More
Note: I am not trained as a graphic artist – so far all have been able to use the diagrams to make the braid. It may not be prettified, but it is apparently functional.
Enjoy The Making
Wheat
October 30th, 2013 at 10:00 am »
Comments (1)
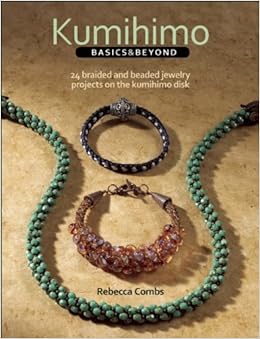
Received a review copy of the new book by Rebecca Combs – Kumihimo Basics and Beyond yesterday.
From a “Braider First” perspective”
Very mixed feelings, on the one hand I like that the author has apparently worked very hard to be accurate and use more traditional terminology.
Ms Combs did supply some “kumihimo math” – but one has to remember that is only going to apply to these braids. For those who preferred to have more detailed materials lists, each braid does have a well done supply list for each pattern supplied in the book.
There is great eye candy, and while I do not really object to “heavily beaded braids” it was disappointing to have it all be “only” 8 element Kongo except for one 16 element project.
There were some other small details, but it did a bit better than most of the books and pattern presently offered in providing some finishing information.
With an SRP of $21.99 US, but already showing up discounted on Amazon, this will be one we likely not choose to stock. but will order if a customer really wants it at the price we can afford to sell.
From the Bead Jewelry Maker Perspective:
with thanks to Carolyn for sharing her view –
Caroyln wrote: “I also got a review copy of this book, thanks to my local bead shop’s partnership with Kalmbach and my status as resident kumihimo instructor. I found that the book is really geared to a beading audience, someone who is looking to expand their variety of jewelry making techniques as opposed to someone who is looking to start in the discipline of braiding. That being said, for that audience this may be the only book they will ever need, and is a starting point for those wishing to go truly beyond.
All the braids in the book are round braid/kongo gumi, so once you have the basics of that braid down you can complete any project in the book. There is a lot of good advice on making braids, and this may be the only book that shows you what common braiding mistakes look like so you can see how to correct them. It’s an excellent first braiding book for those interested in the disk. The only things I don’t like about the book is that she ends every braid by gluing it into a bead cap or cone, and the author doesn’t use a counterweight unless she’s also using beads. ”
We seem (Wheat & Carolyn) agree, tThis would not be a book for someone already comfortable with basics of beading and braiding and ready to grow their skills for more diverse pieces.
However for someone wanting an low cost entry level to the most basic of beaded braiding, it might be okay as it is already being offered at less than I can obtain it thru my distributor, so we will be referring folks to Amazon where possible
Me, I am saving my personal money for the upcoming Jacqui Carey book due in January. In fact, already on order with our distributor.
updated:
June 15th, 2009 at 06:27 am »
Comments (0)
Burying Ends – The basic technique
– draft 15-Jun-2009
It seems that no matter what the craft, if it uses string, sooner or later, every one asks for/needs suggestions on how to bury ends.
It is also important to consider “suitable to the project” – one would not want to make HUGE holes, even on the backing of a large quilt.
No matter what I am teaching, I always tell students that they should leave LONG tails – this will vary depending on the technique
For Quilting/Sewing or most other needle work, at least 4in/10cm and my personal practice is about a foot. This will allow you to use something like Clover’s Self-Threading Needles
For knit and crochet, enough yarn to form at least 3 or more complete stitches, but usually about 12in/30cm – If you have MANY color changes, this could add up, so you will want to consider learning Russian Join or some other “bury as you go technique”
Again, This may seem wasteful but…
Unless you are using real precious metals, it is just not worth the frustration! Yarns, thread, or most stringing materials are relatively inexpensive. Certainly much less expensive than the mind altering migraine meds that such frustration leads to
You can always use the thrums for something else later so feel free to save them.
Okay, so now you know that “for future reference, but what to do with that project with a gadzillion ends NOW?
There are many ways to thread a needle, or more effectively to needle a thread – and many types of needle threaders. ItsAllJustString.com
Although I sell many different threaders, for burying thread ends, particularly possible short ends.
Rather you may find this low tech ‘technique’ suggestion. While I am sure I was not the first to invent it – it was something I started doing in relation to bead stringing so will claim rights to parallel development*.
You will need
Needle almost any size will do – (Bead Note: it MUST be able to go thru your beads while threaded with hand sewing thread that has been knotted to create a loop _NEEDS MORE EXPLAINATION
Length of Thread
Generally I use Nymo or Bobbin thread or Perle Cotton – it will depend on the technique and the “holes” that exist in the fabric.
Needle – type will vary depending on your project, but for buying say quilt ends
Optional:
Flexible sheet foam
Tweezer or Forcepts that are capable of easily gripping the yarn or thread used in the project.
1. Using a strong but fine thread, thread a needle with a length of thread at least 3-4 times the length of your needle (i.e. if you needle is 2in/5cm long, use a piece of thread measuring 6in/15cm to 8in/20cm in length) it is just easier to work with. Generally I use bobbin thread or for nymo, but whatever you choose it should be strong.
2. Tie a secure knot about 1/2 inch LONGER than the length of your needle. I actually keep a bit of flexible sheet foam in my “tool kits” so that I will have something reasonable firm to “tie the know against” – but still flexible for easy removal of the loop you are creating.
3. Slide the loop off – trim ends but not too close –
don’t want the knot to come out
4. Using the tweezer or even a ‘thread crochet hook’ pull the thread end into/thru the loop.
If it is very short, you may want to “hold it with the tweezer”
*Sincerely hoping this explanation will avoid a lot of unnecessary – it was ‘refined” a bit for stringing beads onto carrier YARNandTHREAD
